Sometimes you learn things about yourself that just kind of make you laugh. This blog is kind of like a filing cabinet for myself. I keep ideas that we've done and remember if they worked well or not and all that jazz. When getting ready for school starting I decided to start reviewing and tweaking my lesson plans for next year. I went to the letter z link and realized, there are no letter z activities posted.
This made me laugh because I do a letter z lesson every year, but is has never been posted because I am always behind, and then summer hits, and then I stop posting, and then the school starts again, and I start over posting stuff from the beginning of the year, which is, you guessed it, letter a.
Silly Miss Laura. Anyway, this isn't a letter z post either. Hahaha. It should be, but, well, it's not. Maybe someone needs to send me weekly words of encouragement that I can get the year done before school starts. I will work for chocolate if that interests anyone. :)
I think I miss posting things because I am feeling really chatty. How was your summer? Mine was crazy, but I have been learning some really cool stuff with all the classes I am taking. Ok, for real.
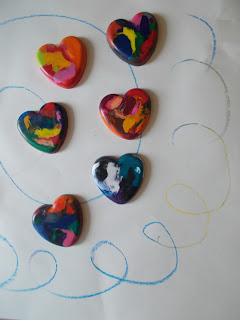
Rainbow Crayons.
Amidst the crazy, my kids and I did an impromptu craft project. We made some rainbow crayons. We ended up using them for party favors, but we have also used them for Valentines, put them in church bags, or kept them in my purse with a small notebook for times when you unexpectedly have to wait and you haven't brought a bag of toys like you might normally do if you knew you were going to wait with children in tow.
It's really easy and a great thing to do with all your broken, left over crayons. I don't know about you, but left over crayons are abundant in our house. Ours live in a can, yours might live in a pencil box or a bag or a box, but I know they are lurking around your house somewhere. This is a great solution for what to do with them instead of throwing them out. Plus, this makes a great rainy day project.
Some brands melt better than others and I'm sure there's a scientific reason, but we just threw whatever we had into the mix.
1. Gather your broken crayons. Peel them, and break them into 1 inch or smaller pieces.
2. Put them into an oven safe, shaped muffin tin. We had hearts on hand so that's what we did, but you can always do it in a regular muffin tin if you want.
3. Put pieces into the tins and fill them pretty full.
4. Bake at the lowest temperature possible for about 30 minutes. Each oven/crayon type is different, so just keep checking back until all the crayon pieces are melted.
5. Carefully take them out of the oven without swirling or mixing the colors.
6. Let harden, then take out of the tins by tapping them on the floor and slightly bending them.
I know some people use a separate pan that they only use for crayon melts. We used one we normally bake with. After we were done, I scrapped all the hardened crayon bits off, then ran it through the dishwasher and it was fine.


No comments:
Post a Comment