Home

Meet The Teacher

Class Information

Registration

Tuition

Schedule

Curriculum

Philosophy

Contact Me

Songs

Wednesday, April 27, 2011

W is for Worm

Today we ate dirt and worms.

Before we did that, we talked about worms and how they help the flowers grow in the spring and read a book about worms. We listened to the middle part of the Inchworm song from Sesame Street and moved around like worms.


Then we ate dirt and worms.

Here's You Need:
(I know you didn't really think we ate dirt and worms. : )
  • Instant Chocolate Pudding
  • Milk
  • Oreos or other chocolate cookies
  • Sandwich bags that seal
  • Gummy worms
Here's What We Did:
  1. We made some mud. (Chocolate pudding)
  2. We smashed some dirt. (Oreo cookies)
  3. We put some mud in a cup and poured the dirt on top of it.
  4. We added worms.

Friday, April 22, 2011

Happy Easter!

As part of our Easter party, we made Easter bunny masks. After we made our masks can you guess what we did? We learned the bunny hop! (At least a simplified version.)


Here's What You Need:
  • Two white paper plates
  • Pink markers
  • Scissors
  • Stapler
  • Hole Punch
  • Elastic or yarn
Here's What You Do:
  1. Cut the two plates in half. You will need 3 of the 4 halves.
  2. Color the inside of two of the halves pink.
  3. Cut a nose "hole" and two eye holes in one of the other halves and punch two holes on the sides of the plate. It is good to position the holes on the lower half of the plate, but not too close to the bottom.
  4. Draw on a nose and whiskers.
  5. Staple on ears.
  6. If using elastic, tie a strip through both holes to wear around the head. If using yarn, cut two lengths and tie one in each hole. When the child wears the mask you can tie the two pieces of yarn in a bow behind their head.

Tuesday, April 19, 2011

Magic X Paintings

We made magic paintings this week. The kids painted the whole page of a paper with some tape on it and after it dried we took off the tape to reveal a magic picture . . . the letter X!


Here's What You Need:
  • Paper (We used construction paper)
  • Painters tape cut in 12 inch strips or vinyl cut into 1 1/2 X 12 strips (If using computer paper, you will want to make the strips shorter.)
  • Paint & brushes
Here's What You Do;
  1. Make an X on the paper with the vinyl or painters tape.
  2. Have the kids paint the whole page and let dry.
  3. Take off the tape to reveal the secret picture.

X Marks the Spot!

Pirates left treasure and a treasure map at preschool this week. They left letter X's along the trail to a treasure chest with treats and jewelery in it. The kids followed the map and found the x's along the trail until they found the treasure chest.


Friday, April 15, 2011

V is for Vine

Spring time is when the vines start to grow and vine starts with the letter v so we made vine pictures this week. I love the 3-D aspect of this project.


To go along with the project we learned and acted out a poem about seeds.

Little Brown Seeds

Little brown seeds so small and round,
Are sleeping quietly under ground.
Down come the raindrops
Sprinkle, sprinkle, sprinkle.
Out comes the rainbow,
Twinkle, twinkle, twinkle.
Little brown seeds way down below,
Up through the earth they grow, grow, grow.
Little green leaves come one by one.
They hold up their heads and look at the sun.

- Author Unknown

Here's What You Need:
  • Green crepe paper (streamers)
  • Construction paper
  • White glue
  • Green leaves
Here's What You Do:
  1. Cut a long strip of crepe paper. Twist it semi tightly the whole length.
  2. Draw a vine like line across the construction paper with the white glue.
  3. Press the twisted crepe paper along the line.
  4. Repeat steps 1 - 3 until your picture looks the way you want it to.
  5. Add leaves.


V is for Violet

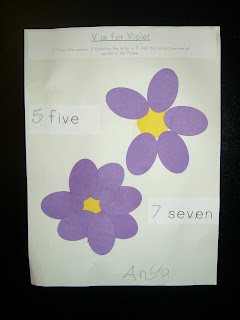
Here is a letter V activity that we did in small groups during center time. We talked about how the word violet starts with the letter v and how it can be used for a color or a flower. We started with this paper.

The instructions say: 1. Trace the number. 2. Underline the letter v in the word. 3. Add the correct number of petals to your flower.

The end result looked like this.


V is for Volcano

We talked about volcanoes this week. I made a simple power point to show what a volcano is and what happens when it explodes. We pretended to be volcanoes by exploding as we were singing songs. Then we made volcanoes. You know the drill: playdough, vinegar, baking soda . . . kaboom!
The kids made the mountain for the volcano by shaping playdough around a baby food jar. I put in red vinegar, we added baking soda and . . .


Thursday, April 7, 2011

Up, up bird!

Spring time = baby birds. Baby birds + letter U week = Up Bird!


Birds that fly up in the sky were our craft for this week. (You can't really tell, but the bird in the picture was up on the ceiling.) We helped the birds fly by making them wings. We read The Magic School Bus Flies From the Nest and learned about how baby birds grow in the Spring time and then learn how to fly. Then, we made wings for our own birds.

Here's What You Need:
  • Balloons (You can use helium or not. The helium are fun because they fly on their own, but it is also fun to hit the other ones around to make them fly. If you get helium, you need to get them the morning of, or there won't be enough helium left to keep the birds afloat once they have their face and wings.)
  • White Vinyl or large address labels for the eyes
  • Yellow paper cutouts of the beaks (See extra instructions below)
  • Coffee filters
  • Washable markers
  • Spray bottle filled with water
  • Packing tape
Beak Assembly (these beaks come from the mailbox magazine.):
  1. Cut out the upper and lower piece.
  2. Cut on the dotted lines and fold on the double lines.
  3. After you have folded on the double lines, the pointy parts of the drawing should be close to touching. Pull those pointy parts together so that they overlap and tape it together. Do this for both the upper and the lower beak.
  4. Flip the lower beak upside down and tape inside the upper beak.
  5. If you want to you can slightly crease the beaks in the middle to make them stick out more.


Here's What You Do:
(I did steps 1 - 5)
  1. Fill balloons to desired size.
  2. Cut out and assemble beaks. Tape onto the balloon
  3. Cut out two ovals from the vinyl or address labels and add black pupils for the eyes.
  4. Stick onto balloon above the beak.
  5. Cut wing shapes out of the coffee filter paper. Each child will need two.
  6. Color the coffee filter wings with washable marker.
  7. Spray a couple of times with a water bottle to make the colors bleed and let dry.
  8. Tape wings on the side of the balloon with packing tape.
As always, if you need help, please just ask!

After doing this a couple times, I do have a few suggestions:
  1. Make sure you get the high float helium in the balloons.
  2. It's best to try to get them the day of the project if possible.
  3. Always get a few extra because some of the balloons just don't handle the extra weight as well.
  4. Use the lightest materials possible to insure a better flight.  
  5. We used a simpler beak pattern this year.  It was only a top beak and I drew it out roughly like the picture below. (No making fun of my lame paint shop skills.: ) You cut out the shape and fold on the dotted lines. Overlap the tabs at the top and tape them together.
 

Aliens Love Underpants

Didn't you know? Aliens love underpants! We talked about underpants for letter U week after reading that book.

We decorated our own underpants to see if some aliens might come and steal our underpants, but luckily they didn't because some of the kids were quite concerned about their visit. : ) I had to reassure them that we were just pretending and it was just for fun.


Monday, April 4, 2011

Tip of the Month: Kindergarten Readiness

As schools start registration for next year, many parents are wondering: Is my child ready for kindergarten? Keep in mind that academics are not necessarily the most important factor when deciding to enroll. You are already doing so much for your children, with your help they will succeed in any classroom. It mostly comes down to your child's attitude toward learning and their ability to listen and follow directions. Here are a few things that teachers are looking for. If your child is exhibiting these things, they are probably ready for kindergarten. Keep in mind that they don't have to be doing all of them all the time.
  1. Enthusiasm toward learning
  2. Solid oral-language skills
  3. Ability to listen
  4. Desire to do things independently
  5. Plays well with others
  6. Good fine motor skills (coloring, cutting, etc.)
  7. Basic letter and number recognition