Home

Meet The Teacher

Class Information

Registration

Tuition

Schedule

Curriculum

Philosophy

Contact Me

Songs

Sunday, December 19, 2010

Q is for . . .

. . .Quadrilaterals
For math time we looked at our pattern blocks. We looked at each shape and counted how many sides it had. We sorted the blocks into blocks with 4 sides and other blocks.

After we sorted the blocks, we used our pattern blocks to make pictures on printable templates. (they came from www.kellyskindergarten.com)
. . . Quilts
We talked about what a quilt is . . . a big blanket made up of shapes that fit together. We looked at a couple of different quilts and discussed what shapes made up that quilt. We also talked about how people make friendship quilts. They make them and give them to their friends to remind them that they love them. We made our own friendship quilt.
We traced and colored our hands on our quilt block. Then we sewed our quilt blocks individually. I punched the holes for the sewing part and we used yarn with tape at the end. I taught the kids that when we sew, we go up and down and we talked about going around the edge without skipping holes.
I was very impressed that most of them got it after 1 or two tries and we didn't have to resew very many times.


Friday, December 3, 2010

Math Activities

As part of our day, we have center time where the kids can choose between a variety of activities to participate in. I use this free time to work with the kids one on one and to practice specific skills.

Here are a few of the math centers we have done the last couple of weeks:

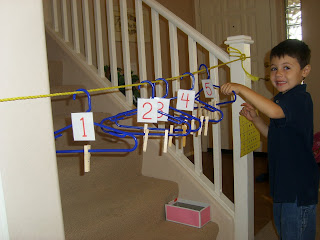
I put laminated numbers 1 - 5 on hangers, one number on each hanger. I put a box with about 15 clothes pins next to it. The kids put the correct number of clothes pins on each hanger, then hung the numbers in order on a rope.

Using the laminated numbers from the previous activity, the kids matched star pictures to the numbers in a pocket chart.


O is for . . .


Opposites!
I found the pictures to make these opposite folders here. We put the letter O painting on the front.


Orange Cherri-O Painting!


Oval, Oak Leaf Turkeys!

Turkeys

As part of letter O day, we made oval, oak leaf turkeys. I got the idea from First School and adapted it a little bit to fit what I had. I used a cricut to cut all the shapes except the beak and wattle.

What You Need:
Oak Leaf cut outs
Google Eyes
Star cut outs
Large oval cut out
Small oval cut out
Beak cut out
Wattle cut out

What You Do:


S is for . . .

Silly Scissors!

Sewing!

. . . and Simon Says, and seeds, and story sequencing, and spiral cutting!


Jack in the Beanstalk

I think this has been one of my favorite days of school all year. To conclude our study on plants, we read about the ultimate plant: Jack's beanstalk.

We read Jack and the Beanstalk by Steven Kellogg. If you haven't read this version of the story, you are missing out. It is a long story and I was worried about the children losing interest, but they stayed with me the whole time because the pictures and the rhythm of the story are hypnotic. It is the best!

I had laminated pictures of the story out of order. The kids told me what happened in each picture and I wrote a caption using their words at the bottom with an overhead marker. Then, we sequenced the pictures on a "story line." Next, we made our own easy beanstalks.

What you need:
Green construction paper for leaves and beanstalk
Cotton balls
Glue
String

What you do:
1. 2.

3. Add cotton balls for the clouds

4. Add leaves all along the spiral
5. Hang it up!


S is for Seeds

Continuing our study on plants . . .

We read the book From Seed to Plant by Gail Gibbons. We reviewed the parts of a plant. We talked about what a plant needs to grow. Then, we planted seeds.


G is for Garden Graph

As part of our month study on plants, we talked about gardens.
We read the book Tops and Bottoms by Janet Stevens.

Then we taste tested different vegetables that grow in gardens. The kids decided if they liked the vegetable and then we graphed the results. We tasted carrots, cucumbers, broccoli, cauliflower, celery, and peas in a pod. It was good to help the kids take a step out of their comfort zone, to try new foods. I was surprised that cauliflower seemed to be the most popular vegetable. Interestingly enough almost all the kids said that they liked each vegetable they tasted. I have a sneaking suspicion that they wouldn't be as amiable if these vegetables were served at dinner.

Unfortunately I didn't get any pictures, maybe next time!

G is for ground and grows

Wow! I have a whole month of activities to catch up on. Maybe it has something to do with having a new baby or something like that, I don't know. Anyway, thanks for being patient! I hope you enjoy the things we did this month as much as I have!

We talked about plants this month and did a lot of fun plant activities.

The first day we read the book A Tiny Seed by Eric Carle and talked about how plants grow in the ground. Then we made these parts of a plant pictures. The activity is pretty self explanatory.
As an extension, you could have the students label the parts of a plant.


Tip of the Month: The Write Stuff

There are many steps along the road of learning to write letters. Children must have many opportunities to use their hands to do various things before they can successfully print letters. Many of the things we do during center time and activity time help your child develop their fine motor skills to help them take those steps towards writing. Here are some ideas of what we do that you can also do at home to help your child develop the skills needed to write:
  1. Modeling with clay
  2. Using small and large Legos
  3. Picking up beads
  4. Playing with knobbed puzzles
  5. Using paper, paper clips, staples, pencils, markers, and crayons
  6. Stencils
  7. Sidewalk chalk
  8. Finger painting or painting with large brushes
Encourage your child to write notes to their friends or messages to other important people in their life. As they are playing dress-up or pretend, encourage them to write props to add to their play: menus, shopping lists, paper money, tickets for a show, signs for shops, etc.

As children experiment, developmental stages of writing become evident. Children move from random scribbles to controlled scribbles, to random alphabet letters, to consonants that represent words. Only with lots of opportunities to practice can children move through these stages.

If your child does not have a proper pencil grip, cannot purposefully manipulate a crayon, or simply shows no interest in learning to write, they probably aren't ready to do so. Take care not to push. Children enjoy learning a new skill only when they are ready for it. Getting ready is just as important as mastering the skill.

Christmas is a great time to stock up on writing material for your child. They make great stocking stuffers and gifts!

- Excerpts taken from Brad Wilcocks


Tuesday, November 2, 2010

Tip of the Month: Beginning Writers

As parents we get a lot of information about reading, but we rarely hear about the important development of writing. Writing, drawing, painting and other fine motor skills are so important to practice for further development. You should be writing or doing some other form of written expression with your child every day. Make sure to check how you child is holding their pencil, crayon, etc. Below I have included a quick overview of the early stages of writing and spelling. The picture is small, so click on it to see the details of each stage. Preschool aged children generally range between a one and a four.


Sunday, October 31, 2010

Germs & Hand Washing

We are going to learn a new song this week that I think is important enough to post separately from our regular song page. Parents may not realize, but good hand washing is a learned skill.

Here is a quick way to teach about the spread of germs and a song to teach children while washing their hands.

Have one child come up to the front and put glitter on their hands. Talk about what germs are and how we can spread them. Explain that we are going to pretend the glitter is germs on their hand. Have the child with glitter on their hands shake hands with someone else. Observe how the glitter gets passed to another person. Have that person shake hands with the next person, etc. Explain how important hand washing is to prevent the spread of germs.

Hand Washing Song
(Sung to the tune of Are You Sleeping?)
Have students practice washing hands and doing the motion while they sing. Over is on top of the hand, under is washing the palm, in between is washing in between fingers. Make sure not to sing it too fast!

Over, under, over, under
In between, in between.
Over, under, over, under
Now we're clean, now we're clean.

Repeat.

Sunday, October 17, 2010

F is for . . .

We worked on the letter F this week in school.

Art: F is for fish.
We made coffee filter rainbow fish after reading the book Rainbow Fish.
How to Do It:
You Need:
markers
coffee filters
tin foil
spray bottle
glue

To Make:
  1. Color the filter completely with the markers.
  2. Spray with the water bottle and let dry completely.
  3. Cut out fish shape.
  4. Decorate with cut pieces of tin foil.
Science: F is for float?During science time, we predicted whether certain objects would sink or float in water and then tested our hypothesis. This activity will keep kids of all ages busy for a long time, just be ready to clean up a lot of water off your floor!

Social Skills: F is for friendship
After reading the book Rainbow Fish, we talked about how to be a good friend. We came up with three things that good friends do:
  1. They play with each other.
  2. They talk nicely.
  3. They share.
The kids then looked through magazines to find pictures of people being good friends and cut them out.

Literacy: F is for Fall
Season Books
We read the book Leaves by David Ezra Stein. We talked about the different seasons of the year and how we are starting the season of Fall. The kids made books for the seasons of the year. Each book had 5 pages: Cover, Fall, Winter, Spring, Summer. Each season page had a picture of a tree with no leaves and the name of the season at the bottom for the kids to trace. Here is the tree that we used:

How to Do It:

You Need:
book pages printed for each student that have a bare tree and the name of a season at the bottom of the page to trace over
pinto beans
fruit loops
red, orange, and yellow small tissue paper squares
cotton balls
glue

To Make:
  1. Have the students decorate the cover for their book. Our cover said, "My Book of Seasons, By: ____________." It also had a small picture to represent each season that the students colored. (Leaf, Snowflake, Flower, Sun)
  2. Have students create the season pages of the book. Have the students trace the name of the season at the bottom of the page.
  3. Decorate each tree with the following: Spring - pinto beans for the buds on the trees, Summer - Fruit loops for the fruit on the trees, Fall - tissue paper squares for the fall leaves, and Winter - torn up cotton balls for snow.


Tuesday, October 5, 2010

Reading For Understanding - Comprehension

Ask these 15 questions before, during, and after your reading time to help develop comprehension skills at home.

Questions to ask before reading:
  1. What does the title tell you about the story?
  2. What do the pictures tell you about the story?
  3. What do you already know about . . .? (Discuss the topic of the book.)
Questions to ask during reading:
  1. Who? Who is doing something right now in the story?
  2. What? What is going on right now in the story?
  3. When? When is this taking place?
  4. Where? Where is ______ happening?
  5. Why? Why did _______ happen?
  6. How? How did _______ happen?
  7. What do you think will happen next?
Questions to ask after reading:
  1. Who were the characters or people in the story?
  2. What was the setting for the story? Where did the story happen?
  3. What was the problem?
  4. How was the problem solved?
  5. Why did . . .?


Thursday, September 30, 2010

Color Zoo

In class we read a fun book by Lois Elhert called Color Zoo. The author makes fun animals using simple shapes for their various face features. As you turn the pages, it takes a large shape away to reveal a new animal.

We made our own color zoo in class using a variety of shapes in a variety of sizes. We talked about what animals we see in zoos and how we can make their eyes, ears, noses, and mouths using shapes. Next time, I think we will look at pictures of the animals that they want to make and talk about what shape would be best for each feature. We would talk more about how animals with pointy ears, would use pointy shapes to make the ears, etc.


Very Talented

We have had an epidemic of talented toes in our classroom lately. The kids have all started picking up things that they drop with their toes instead of bending down to pick it up. (I wonder where they got that idea from? If you didn't know, I am 8 months pregnant.) It is so funny to watch and some of them have gotten quite good at it. It is so fun to be around such life, loving kids!


Tuesday, September 28, 2010

D is for Drums

We explored sound this week in preschool.
I have a collection of various different instruments that the kids got to try out and play.
We watched a short segment from Blues Clues: The Musical. Ray Charles teaches Steve about notes, rhythm, and tempo. Then we tried using our voices and instruments to make different notes, rhythms, and tempos.
We explored soft verses loud sounds by trying to put different objects into easter eggs and shaking them. We recorded which objects made loud sounds and which objects made soft sounds.

But most importantly . . . we made our own drums! (Thank you so much to Hudson's mom for donating the cans for us to use!)

We had our own drum line.

And you can't have drums without a parade!

Here's how you make it:

You Need:
Aluminum cans with lids (like coffee cans or instant breakfast cans)
Felt
Construction paper
Rubber bands
White glue & glue sticks
Tape
Flat push pins
Twine (optional)

What you do:
1. Cover the lid with white glue and press it onto the felt. After it has dried, cut a circle around the lid about 2 inches bigger than the lid.
2. Cut the construction paper to fit around the can. Tape pieces together as necessary.
3. Cut a strip of felt about 3/4 inch wide to cover the rubber band you will use later.
4. Decorate your construction paper and let dry completely if you have used glue.
5. Use glue stick to put glue all around your can and press the paper onto the can. Use a bit of tape to hold it on if necessary.
6. Put on the felt lid and secure it with a rubber band around the top of the can. Pull the felt tight under the rubber band. Glue the felt strip over the rubber band to hide it. Put the pushpin at the end of the felt strip to hold it in place.
7. (If wanted) Use a hammer and nail to nail two holes in the side of the drum. String the twine through the holes to make a band that goes around your neck.

For drum sticks, we used un-sharpened pencils, but you could make your own with dowels and rolled foam or yard covered foam balls.