Home

Meet The Teacher

Class Information

Registration

Tuition

Schedule

Curriculum

Philosophy

Contact Me

Songs

Friday, August 31, 2012

B is for Bones - An Object Lesson

 We decided to study our bones for letter B week. Most kids don't understand what their bones are for. Here is a simple object lesson to teach what our bones are for.

Here's What You Need:
  • Cut out of a human body on plain printer paper
  • Popsicle sticks or skinny sticks (found by the popsicle sticks)
  • Tape
Here's What You Do:

1. Discuss what different parts of our body are for: eyes - to see, ears - to hear, stomach - to hold food, mouth - to talk and eat, etc.
Ask  - What are our bones for?
2. Show the body cut out and ask the kids if it can stand up by itself.
Explain that this is what our body would be like if we didn't have bones. Bones help us have shape. They are like the frame for a house.
3. Tape popsicle sticks to the body cut out  - give it some bones - and then see if it can stand up.

What would we be without our bones? A puddle on the floor!


Wednesday, August 29, 2012

B is for Balance


 Use painters tape to make some balancing paths on the floor. I put cut out letter B's along the path for her to try to pick up without stepping off the line.

 Lot's of fun and a great large motor skills practice!

Monday, August 27, 2012

B is for alpha Builders


We found a great letter learning tool from this blog. She calls them alpha builders which is a very perfect name. You use the different shapes to build letters. This is going to be a new staple in our letter learning curriculum! 


I made one change to her directions, instead of using magnetic laminate, I just laminated and attached magnets to the back. It still worked great and this was an awesome discovery and learning experience!

Thank you so much Erica!


Apple Star & Poem

Most of the time when we cut through an apple, we cut it in half from top to bottom. But, the coolest thing is that if you cut it in half through the middle, there is a star shape inside! 

Anya and I spent some time talking about apples and what colors they come in. We taste tested the different colored apples and we talked about how apples grow. 

Then, we cut the apple in half through the middle and talked about the apple core. The star shape holds the seeds so that new apple trees can grow. It was a fun discovery to look at each part of the star and see if it was holding seeds and then count how many all together. 


After that, we used the apple as a stamp and made a little apple star card. The poem on the left says:

There's a star inside an apple!
It's a miracle indeed,
That this sweet and juicy apple
Was once a tiny seed!

I hope you have fun discovering how cool apples can be!

Saturday, August 25, 2012

Mini Apple Cobbler

 
When I think about apples, I think about all the yummy foods you can make with apples and of course apple pie is at the top of that list. I really wanted to make apple pies for letter A week and I got some great inspiration from Our Best Bites for their pie in a jar.

However, I have a confession to make. I, Miss Laura, am afraid of making pie. It's not the filling I am concerned about, but I am terrified of homemade pie crust. I think the large margin for failure makes me a little nervous. Anywho, I decided to play a little with the pie in a jar idea and it turned into cobbler in a jar. It. Was. Delicious!
 
(These instructions are for 4-8 oz short jars, if using a different number or size, you can adjust accordingly.)
You start out with short mason jars. They come in two sizes - 4 oz, straight sided jars like mentioned on Our Best Bites and 8 oz, curvy ones which is what we used.  Surprisingly, I found both sizes at Walmart. Sometimes you find weird stuff there and sometimes you strike out. I really think there is no rhyme or reason to that store except to be big and random. 


First you peel, core and chop 3 apples. If you want to do this ahead of time, you can toss the apples in a little bit of lemon juice and it will keep them from browning. Just be careful not to do too much, just enough to get them a little wet.

After that, measure 1/2 c water and add to the apples. This was a great opportunity to discuss liquids vs. solids as well as different kinds of measuring cups. Cooking is always a great way to talk about math and measurement! 


Sprinkle some cinnamon to taste. If needed, stick your tongue out to the side to get just the right amount. : ) Mix apples, water, and cinnamon. 
 
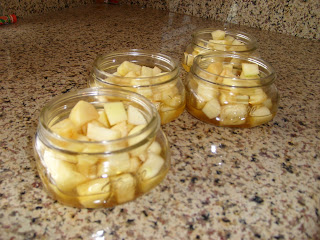
Evenly spoon the apples into the jars. Distribute any water at the bottom of the bowl evenly into the jars as well. 
 
You might have a few pieces left over depending on how big your apples were. If so, enjoy a prebaking snack!
 

Next up is the crumb topping.  Mix together 1/2 package white cake mix, 1/2 c brown sugar, & 1/2 tsp cinnamon. Then, cut in 1/2 c soft butter with a pastry blender or some forks until mixture is crumbly.
Top apples in jars with crumb mixture.

The great thing about this project is that you can bake it now, or you can save them for later. We wanted to share our creation with the rest of the family so we put the lids on and popped them in the fridge so we could bake them after dinner. If you are making this with a class, you can send it home with them to bake at home. 
When ready to bake, take the lid off and put the jar on a cookie sheet in case of spill over. Bake at 350 degrees for 45-55 minutes. 

Top with whipped cream and enjoy your hot, fresh, perfectly sized mini apple cobbler!

Mini Apple Cobblers
(Makes enough for 4-8 oz sized mini jars)

Ingredients:
4-8 oz, short mason jars
3 apples - peeled, cored, and diced
1/2 c water
cinnamon
1/2 package white cake mix
1/2 c brown sugar
1/2 c soft butter

Instructions:
Mix apples, water, and cinnamon to taste in a bowl. Divide apples between the jars and distribute any remaining liquid evenly into the jars.

Mix cake mix, brown sugar, and 1/2 tsp cinnamon in another bowl. Cut in butter with pastry blender or some forks until the mixture is crumbly. Top apples with crumb mixture. 

Put on lid until ready to bake. When ready to bake, preheat oven to 350 degrees. Remove lids and place jars on cookie sheet. Bake for 45-55 minutes.


Friday, August 24, 2012

10 Apples Up on Top

After we "picked" apples from our apple tree, we used the apples to do an art project. (Click on words to link to that project.) 

We read 10 Apples Up on Top by Dr. Seuss and then made our own 10 apples up on top crowns. 


Each apple Anya had picked from the tree had a number written in crayon on it. We used watercolors to paint each apple. After they dried, we glued them on a long piece of cardstock in numerical order and wrapped it around her head. Easy peasy and she loved walking around with her own 10 apples up on top for the rest of the day!

Picking Apples

As we continued our talk about apples this week, we did a couple of fun apple related activities. We talked about apple trees, how apples grow, and how people pick the apples out of the trees. 

 Anya practiced her fine motor skills by "picking" apples off a tree with mini tongs. 
We used "appetizer tongs" but you could also use ice tongs or big tweezers. The apples are pom poms.


We picked apples with numbers on them from our apple "tree." I know that the apples aren't the right color, but I did it on purpose because we used them again for our 10 apples up on top activity. (click the link to see what we did.)  

 
* Safety note, except when I took the pictures, I made sure to be near her while she was up on the stool in case she fell.*
Anya and I drew a tree using Ikea's drawing paper roll, but you could use anything: cardboard, posterboard, etc. Then I cut out and labeled apples with a number 1 - 10 and Anya "picked" them in numerical order and put them in her basket. 


I stuck them up with sticky tack. If I weren't using the apples for another project, I would have done them on colored paper, laminated them and used velcro so that we could reuse the tree over and over.  

Tuesday, August 21, 2012

Apple Seed Counting

Practice counting and number reconition with this apple related center. Trace the numbers and glue the correct number of "seeds" onto each apple. We used pinto beans (it's what I had on hand), but I think black beans are a lot better because apple seeds are black. You could use real apple seeds if you had enough. 


There are two free printables - numbers 1-5, and numbers 6-10 as shown above. Click here for 1-5 free printable.  Click here for 6-10 free printable. 

Monday, August 20, 2012

A is for Airplane


What fridge wouldn't be a lot cuter with a squadron of these airplanes to hold your child's art? 

I could also see these being a fun project to give to an aviation enthusiast on Father's Day. You could glue push pins to the back instead of magnets for dad or grandpa to put up at work to show off pictures of their little ones!

They are quick, easy, and you can probably make them with things you already have at home. 


Here's What You Need:
  • 1 clothes pin
  • 3 popsicle sticks & scissors
  • glue
  • foam
  • magnets (we used a sticky backed magnet roll and cut pieces to fit on back)
 
 
Here's What You Do:
  1. Cut about 2 inches off of one of the popsicle sticks and round the corners
  2. Paint both sides of all the popsicle sticks, including the short stick
  3. Paint all sides of the clothes pin
  4. Cut a rudder out of the foam (we cut two pieces out of sticky backed foam paper and stuck them together to make the rudder thicker)
  5. After the paint has dried, glue airplane pieces on as shown above
  6. Attach magnets to the back of the clothes pin. . .
And prepare for take off!


Wednesday, August 8, 2012

Hexagon/Fraction Cookies

I know we've posted a few fun activities using pattern blocks and I just wanted to put a plug in for what an awesome toy they are to have in your house. They are a great learning tool that allows you to talk about colors, shapes, patterns, geometry, fractions, . . . Plus they are fun to build with! 

You can find them at most learning stores or online and they would make a great gift for birthdays or Christmas. Anywho, back to the activity - 

My 3rd grader was asking me if we could practice fractions and this seemed like a fun activity that we could all do together. Since I am very pregnant and food is my happy place, we called them cookies instead of calling them fractions. I gave each of the girls a hexagon cookie paper. (Click here to download your own cookie paper.)


I asked my preschooler to find the block that is the same shape as a cookie and we reviewed the term hexagon.  Then, I challenged both girls to make more cookies using other shapes. When needed, I gave hints like: can you make a cookie using the red blocks or using the triangles, etc. 


After they found all of the possible cookies, without repeats, they made their favorite cookies in the extra hexagon shapes. Then, we split off to do some age specific learning. My preschooler and I talked about what shapes, colors, and how many blocks each cookie was made with. Of course she had to eat the cookies as we were done talking about each one. : )


My 3rd grader and I discussed fractions. She figured out what fraction each shape was (i.e. a diamond was 1/3 because it took 3 diamonds to make a whole cookie or a trapezoid was 1/2) Then she wrote the number sentence that corresponded with each cookie.  


To end our activity, the girls made their own pictures using the pattern blocks.


Emma sent you a message with her robot picture - Hello! 
 

I hope we've sold you on how great these blocks are, hopefully you'll go out and get some for your kids to enjoy!


Thursday, August 2, 2012

Monster Bookmarks

Wouldn't these little guys be a fun addition to your child's pencil box or backpack or to your home library? Make them as a back to school gift or make them together as a fun afternoon activity. 


We had a lot of fun making these bookmarks that help you eat up a great book. (Excuse the pun ; ) Even though my preschooler doesn't "need" a bookmark to save her place. She loves putting it on the books she is looking at or on the books she wants me to read to her.


We used the great tutorial at Tally's Treasury and added a bow for extra beauty. She includes a printable template as well as a step by step for the how-to. For detailed instructions click here. 


Happy reading!