Home

Meet The Teacher

Class Information

Registration

Tuition

Schedule

Curriculum

Philosophy

Contact Me

Songs

Tuesday, September 27, 2011

D is for Doggy

Today we played a version of Doggy, Doggy Where's Your Bone?

The kids sat in a circle with bones in front of them. Each bone had a number.
 

One child was chosen to be the doggy. That child closed their eyes and we all said, "Doggy, doggy where's your bone? Somebody stole it from your home. Guess who, maybe you."
 

While they were saying this, I secretly passed one of the bones to another child and they all put their hands behind their back like they were hiding the bone. When we said, "maybe you" the doggy opened their eyes and picked the person who they thought had the bone. When the bone was found, we said what number it was and then switched doggies and did it again. 

To make the doggy ears, I slipped a curled piece of card stock into a brown knee high (if you round the edges, it is easier to put in) and attached them to a baby headband. I just used what I had on hand and made it very temporary (with safety pins) so that I could disassemble it easily. You could also use socks, felt, or something else that looks ear like and sew it on.

Monday, September 26, 2011

C is for . . .

. . . cupcakes!

. . . caterpillar chains!

For more detailed instructions see our post here.

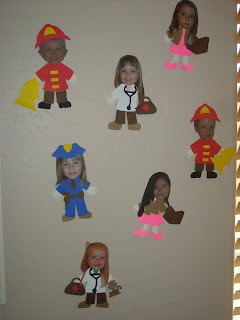
. . .community helpers!

To continue our talk about our town, we talked about community helpers this week. I found this really fun book titled Whose Hat is This? by Sharon Katz Cooper that talks about different community helpers.

Each child chose what kind of community helper they want to be when they grow up. Then, they made their own paper dolls of themselves. I used the Everyday Paper Doll cricut cartridge to do the cut outs.

Sunday, September 25, 2011

A is for Apple

We sorted green and red apples.

We made apple smiles for snack by putting peanut butter and marshmallows on apple slices. (A quick tip for helping put peanut butter on apple slices is to make sure that you dry the slices with a paper towel before you spread on the peanut butter.)

I had this great idea to make 3-D apples trees for letter A week. My first couple of ideas had a few issues, but the final product was cute.

Here's What You Need:
  • red and green pom poms
  • card stock with apple tree top on it
  • sticks
  • glue dot or tape
  • liquid glue
 
Here's what You Do:
  1. Print off the tree top onto the card stock.
  2. Cut a slit right under the tree where the trunk should go. Cut another slit about and inch from the bottom of the paper.
  3. Slip the stick through the two slits and attach it to the back with a glue dot or tape.
  4. Decorate the tree top with pom poms.

P.S. Here's what the original was going to look like. It ended up being better for older kids because it was hard to keep the pom poms on the Styrofoam ball.

Our Milk Carton Town

This year's theme is "Oh the Places We'll Go." The first place we are visiting is our town. We have been talking about places that we go in our town and also people who make up our community.


To kick off our talk about our town, we made our own town using milk cartons. We read the book Franklin's Neighborhood and talked about the places that we like to visit in our neighborhood. Each child then picked a place to make their milk carton into. The kids made the library, stores, churches, houses, and schools. 


After they made their buildings, they put them on main street (that I drew on a black paper with white crayons) and drove to each others buildings with matchbox cars.

If you would like to make your own milk carton town, here's the details.

Here's What You Need:
  • Milk cartons - 
I got ours from my husband's elementary school class. You could get them from your local elementary school by buying the milk during lunch time or by asking a teacher to collect them for you. Make sure you wash and disinfect them before you use them. (I used bleach water after I washed them out.)
  • construction paper
  • tape
  • glue dots
Here's What You Do:
  1. Cut out two pieces of paper. One for the roof that is brown and one to go around the sides that is white. Our brown one was 3 3/4 X 2 1/4 inches. Our white one was 3 X 9 inches.
  2. Use the glue dots to attatch the brown one up and over the top of the milk carton.
  3. Decorate the white paper with doors, windows, signs, etc then tape it around the sides of the milk carton.
  4. Put your buildings and cars on the streets and get cruisin'. 
 

Sunday, September 18, 2011

Color Scavenger Hunt

We had a lot of fun making our binoculars again this year to go on our color scavenger hunt. For specific instructions on that project, click here and see our old post.


In order to make it more complex for my four year old class, I added a paper for them to fill out while they were finding the colors. Each paper had 8 square with a different color in each square. Next to each colored square was another square that was blank. When they found something of that color, they drew what they found in the blank square.


Tuesday, September 6, 2011

Tip of the Month: Reading and Phonemic Awareness

As your kids are getting better at understanding the letters and their corresponding sounds, they might start to show an interest in reading. Here is some quick info about the process of learning to read and a few simple ideas of how you can increase phonemic awareness.

Phonemic Awareness
Each word is made up of small parts of sounds (phonemes). Ex. "Stop" has four phonemes /s/ /t/ /o/ /p/. Having phonemic awareness means your child can hear, identify and manipulate the individual sounds in words.

Phonemic awareness helps children read and spell.

Here are a few games you can play with your child in the car, in line at the grocery store, or while you are reading together.

1. Find words that all start with the same letter. Or which word doesn't belong. - bug, bun, rug.

2. Blending individual letters to make a word. Ex. /b/ /a/ /t/ squished together makes bat.

3. Rhyme together. Ex. "The pig has a . . . ?" Wig!

4. Clap out the syllables in words.

5. Identify the first sound in a word. Ex. What's the first sound in van?

*Information comes from Put Reading First (2001), a pamphlet put out by the Center for the Improvement of Early Reading Achievement and the National Institute for Literacy. For more information or to get your own copy go to nifl.gov