Home

Meet The Teacher

Class Information

Registration

Tuition

Schedule

Curriculum

Philosophy

Contact Me

Songs

Showing posts with label Letter C. Show all posts

Tuesday, November 28, 2017

C is for . . .

. . . caterpillar chains. We made paper chains into caterpillars. We used this as a math focused activity and worked on making patterns with the colors on the chains. For more detailed instructions click here.
. . . cookies! We sang C is for Cookie with the cookie monster (on youtube). We read the awesome book, "The Doorbell Rang" by Pat Hutchins about some kids who have to share some cookies with their friends in a fair way. Then we learned how to "share" cookies. Each child got 12 cookie cereal pieces (think cookie crisp) and 6 paper people. They practiced sharing cookies with different numbers of people. 
After they shared their cookies equally, they would write on a worksheet how many cookies each person got. 
This is one of my favorite lessons, it is a fun way to introduce division to young children using the idea of sharing fairly. It really makes them stretch and grow.
 To get the full instructions and a free printable, click here.

Thursday, November 3, 2016

C is for Caterpillar Chain

We used our math skills to create pattern loving caterpillars during letter c week. 

I provided each child with a premade caterpillar head and the kids used paper strips to give each head a body. The trick was that they had to add the chain links in a pattern. 

Some of the kids did an abab pattern. Some did an abcabc pattern. One of our kids even did an ababcdcd pattern. It was fun to see them catch on so quickly. 


If you want to make your own caterpillar chains, here's what you need:

8-10, 1 x 12 inch strips of construction paper in various colors per student
1, 2 x 12 inch strip of paper for the head per student in a different color
googly eyes
2 small strips of paper for the antennae (curl the strips around a pencil or with scissors)

Give each child a premade head and let them create a pattern for the body. It can help to have them create the pattern completely before they start adding chains to the head. Make sure to remind them that after they link the strip through the chain, they bring it up and over the other end of the paper. They often want to sandwich them together in a tear drop shape instead of a chain. 

Happy learning!


Friday, December 11, 2015

C is for Cookie

C is for cookie, that's good enough for me!

Here are some of the fun things we did during letter C week with cookies.

We read this awesome book:

We listened to this awesome song:

We made some sugar cookies

We did this amazing sharing cookies activity. Click here for more details about it.

C is for Sharing Cookies

 When I was teaching elementary school, we did  a math lesson about dividing cookies. I loved it and really wanted to figure out a way to make it work for preschool. After a couple of tries, I am happy to say we have achieved awesomeness! 

It all starts with this book:

In the book, the kids start with 12 cookies and two kids to share them. Then the doorbell rings and they have to share with more. Then it happens again, and again. 

So we read the book and talked about what it means to share things equally or divide them. Then we went over to the preschool table and each child got 12 cookie cereal pieces and 6 people. 

I asked the kids to take out one person and tell me how many cookies they would get by putting all the cookies on the person. We wrote down on our paper that we would get 12 cookies.

We took them off, then took out 2 people and shared the cookies between the two people.

It might take some practice to help the kids pass out the cookies one at a time to all the people. We took them off and then we did it sharing with 3 people.

Next it was 4 people.
Last it was 6 people.


As we were going, the kids wrote down how many cookies each person would get in each group. I used the worksheet below for the older class. For the younger class, the numbers were already on the paper in a tracing font for the kids to trace. 

Of course we ended with the kids eating all the cookies! It was a lot of fun and really rewarding to have finally figured out how to make this lesson work. 

To download our cookie sharing sheet for older kids click here.
To download our cookie sharing sheet for younger kids click here.

Thursday, December 3, 2015

C is for Cloud


Tuesday, October 21, 2014

C is for Car


Here's a fun art project we did for letter C week that goes with the fun story Cars: Rushing! Honking! Zooming! by Patricia Hubbell

The road, cars, and even the exhaust from the cars are made out of the letter c. 

C is for Cookie (that's good enough for me!)

 Making letter c shaped sugar cookies during letter c week was a lot of fun! We started by sequencing the steps for making a cookie. We put each step in order of first, second, third, etc. 
  
The kids helped roll out the dough using soda cans as a rolling pin. 

Then added sprinkles for extra color and flavor. 

The end product was pretty tasty!

 And of course we had to sing this song:


Tuesday, September 18, 2012

C is for Crayon

 If your house is anything like ours, then you have a lot of crayons floating around. We have both a pencil box and a gallon size bag full of them! On top of that, quite a few of them are broken. This week we are going to do a few crayon related art activities to try to use up our huge supply. 


Here's a simple crayon monogram. We did C because we are Chipman's Corner, but you could also do your child's first initial. This might also be fun to do as a gift for a favorite teacher, just frame it without glass or in a shadow box. 

To make it, draw your letter on a piece of paper to use as a guide. We backed our paper with cardboard to give it extra support since we aren't going to frame it right now. 


Break the crayons to a size that fits your letter. Our letter was on a 12 X 12 paper so we broke our crayons in half. 
To attach the crayons you can use a hot glue gun or tacky glue. If you use tacky glue, put a book on top of the crayons while the glue dries to help it stick to the paper. 

Friday, September 14, 2012

C is for Cupcake

 Anya and I love to make stuff together. She loves helping me with dinner and loves helping me bake. Of course, we especially love making yummy things like cupcakes with sprinkles! 

We read If You Give a Cat a Cupcake.

We talked about directions and following them in order. Sequencing is an important math skill to work on with preschoolers. I printed off some pictures from the internet of the steps for making cupcakes and put them out of order next to the board. (Gather ingredients, mix ingredients, put in cake liners, pour batter, bake, frost.)

Then, Anya put the steps in order and we talked about which was first, second, third, etc. I told her we were going to make cupcakes and she was in charge of telling us what to do. She loved this idea! We washed our hands and got to work. A few times, she checked her step by step list to remember what we needed to do next.

In the end, eating the cupcakes was the most important step!

Saturday, September 8, 2012

Broken Bones & Casts

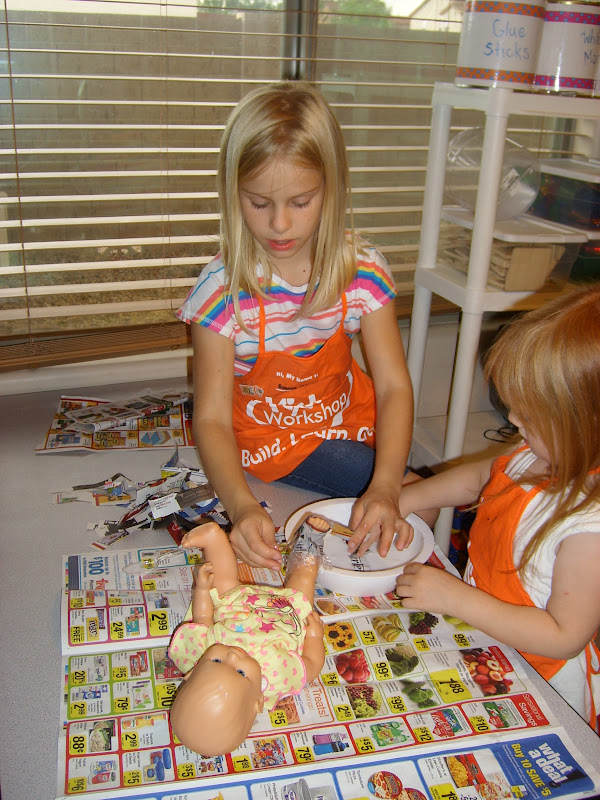
We had a sad thing happen this week. One of our baby dolls broke her foot. : ( So Doctor Emma helped us fix her up with a cast so she could heal. Luckily, she is being brave and letting mommy take care of her while she recovers. 


The girls had fun playing doctor (despite the fact that we don't have any doctor dress up stuff. I think we might have to remedy that pretty soon). When it was determined that baby would have to get a cast, we went right to work. 

We used paper mache and paint to create our pretend cast. It was pretty fun and it was actually pretty easy. Here's the step by step in case you are ever unfortunate enough to have your baby doll break their foot. 

Here's What You Need:


  • plastic doll
  • saran wrap
  • newspaper
  • white glue 
  • water
  • paint

Here's What You Do:
1. Make sure you are using a plastic doll in case the paint or paper mache gets onto the leg or foot. Cover the area with saran wrap to prevent the newspaper from bleeding onto the doll.

2. Cut your newspaper into small strips.

3. Mix  water into the glue so it's about a 3:1 ratio. I didn't measure, just added it until it looked good. Then dip the newspaper into the mixture. Carefully pinch out any extra moisture by running the strip between two of your fingers. Then wrap around the leg. Repeat until the whole area is covered.

4. After it has dried for a day or two, paint the cast.  - We did two coats. 


Hopefully, your baby will recover quickly! When it's time to cut the cast off, just use a pair of scissors.