Home

Meet The Teacher

Class Information

Registration

Tuition

Schedule

Curriculum

Philosophy

Contact Me

Songs

Wednesday, July 25, 2012

Preparing for the First Day of School

Can you believe that the summer is almost over?! I know that some of you out there still have a month to go until the kids get back into the swing of things. But here in Arizona, we start school early. It might have something to do with the fact that by now our kids are getting a little restless because it's so hot that they can't go play outside. Whatever the reason, we are sharpening new pencils, loading up backpacks and stocking up on lunch foods.

Whether your child is starting preschool or elementary school, the first day can be a little scary for moms and kids alike. Here are some simple things that you can do to help ease the transition for your little one. 


Helping Prepare for the First Day
Some or all of these ideas might work for you and your family. Always remember to talk about starting school in a positive and calm way.

A few weeks before school starts:
*      Start talking about school starting and how much fun it will be.
*      Be positive and share with your child what they will do there.
*      Read books about children going to school.
*      If possible, meet the teacher and visit the class ahead of time.

That morning:
*      Leave plenty of time to get ready so you’re not rushed or stressed.
*      Reassure them that you will come and get them when it’s over.
*      Please do not bring toys.
*      If they need a security object, have them bring a book to share when it is reading time.

At school:
*      Engage your child in toys that interest them and talk about all the fun they will have.
*     Leave with a smile and a hug. 
If you show your confidence in their new experience by leaving with a smile, they will pick up on it and start to feel more confident as well.
*      When it is time for you to go, keep your goodbye short and simple.
This can be hard, especially if there are tears, but this can be really important for your child to learn that this is a normal thing. In time, they will learn that school is a safe place, but right they need to see from you that you know they will be happy there.
*      It can help to have a goodbye ritual like a special handshake, song, hug, or special words that you always say.
*      Allow the teacher to help your child or go to the teacher if they need help with a project or have questions. 
Helping them learn to get help from the teacher will show them that their teacher is someone they can trust.
*      Always keep open communication with the teacher about your concerns.
 

After School:
*      Talk about what they did at school that day. 
Sometimes it can be hard to get them to remember what they did. You can ask what they did during certain times of the day. i.e. Math, reading, P.E. carpet time, etc. Or you can just ask them to share 3 things about their day and take whatever they give you. I still do this with my 3rd grader. Some days I get who she played with at recess, what she ate for lunch and where they went for specials. Some days she shares with me more details about her thoughts or what she is learning. Whatever she shares, I take it and know that some days I'll get more information than others.
*      Ask them to tell you about the stories they read or the songs they sung.


Wednesday, July 18, 2012

Toothpick Shapes


I found this idea while searching pinterest - a dangerous pastime, I know (name that movie!) - and I was so excited by the idea. I decided to expand the idea so that it could be used as a multiple day center. I also added an element of writing to the activity. 

You use toothpicks to create different shapes. I used the flat ones that come in a box so that they didn't roll around. 

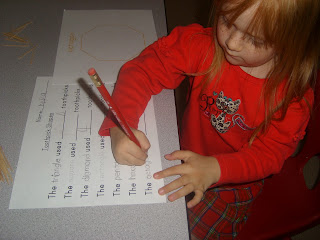
The first day we made the shapes using the document I will link to below. (The shapes are custom made so the sides match the length of the toothpicks exactly.)  We talked about each shape and how many sides it has. Then she used the toothpicks to create the shape. 


Next, she traced the name of the shape, counted how many toothpicks she used, and wrote that number on her paper.  - Because of the writing element of this part, this could take two days instead of one.


The next day, she used her paper and black construction paper to make the shapes without putting the toothpicks on top of the lines. 

She checked how many toothpicks she would need for the shape, then used the picture of the shape as a guide to help her see what angles to use and what the shape looked like.  


The last day, I gave her black construction paper, toothpicks and glue, and she made anything she wanted.

Here is the link for the document with the shapes and the tracing page. I wanted the sides to be exactly the length of one or two toothpicks so the shapes are custom made. You have to sign in to download the document, but it is really quick, easy, and unobtrusive.


Tuesday, July 10, 2012

Quick and Easy Catapults

This summer, we had a lot of fun making some simple, homemade catapults.


Even though I have a house full of girls, they love shooting, flinging, and chucking things just like their daddy! We definitely enjoy watching the Mythbusters Pumpkin Chunkin each year.

What started as a craft with mommy, quickly turned into a family affair. My husband couldn't resist jumping in and helping with target practice once he saw what these babies could do. I was quite surprised at the capability of these little guys.


My girls started by coloring two popsicle sticks with permanent markers. I stacked one of the colored popsicle sticks on top of 5 others (6 all together) and rubber-banded them together on each end. 

We attached a bottle cap to the end of the other colored stick. (We used hot glue, but it didn't quite withstand the torque and pressure so we had to reglue it a couple of times.)  We tried it a second time by using a drill and drilling a hole into the bottle cap and the popsicle stick. Then we used a brad to attach them together. It worked great! After, we rubber banded that stick and another to the top and bottom of the stack of sticks we already made.

My girls had fun seeing which things from around the house would fly the best. They tried everything -  cotton balls, rubberbands, polly pocket clothes, blocks, . . . 

The thing that worked best . . . mini marshmallows! 

Of course if mini marshmallows were the projectile, the target quickly became someone's mouth. I was having so much fun participating in the launching of the marshmallows, that I didn't get any pictures. But, you can take my word for it that it was fun for the shooter and the target and all the spectators as well.


So go out and make your own, you won't be sorry and it is a great boredom buster for any season of the year!

Here's What You Need:
  • 8 popsicle sticks
  • permanent markers 
  • 5 rubber bands
  • bottle cap (from a plastic container)
  • brad & drill
  • mini marshmallows

Here's What You Do:
  1. Color  two of the sticks with the markers.
  2. Stack one colored stick on top of 5 other sticks (6 total) and rubber band them together on each end. (We tried this again with big popsicle sticks - we ended up having to stack 10 sticks together to really make it fly. You can play around with how many you stack together to get the height that you want.)
  3. Drill a hole the same width as the prongs of your brad into one end of the other colored popsicle stick. 
  4. Drill a hole into the bottle cap. 
  5. Use the brad to attach the bottle cap to the colored popsicle stick.
  6. Stack that perpendicularly on top of the stack of 6. (Like a cross)
  7. Stack another underneath the pile so it lines up with the stick with the bottle cap. 
  8. Use two rubber bands to attach the sticks as seen in the picture above so they make an x across all 8 sticks. 
  9. Pinch together the stick ends opposite the bottle cap and use a rubber band to hold them together.
  10. Find some projectiles and some targets and fire away!